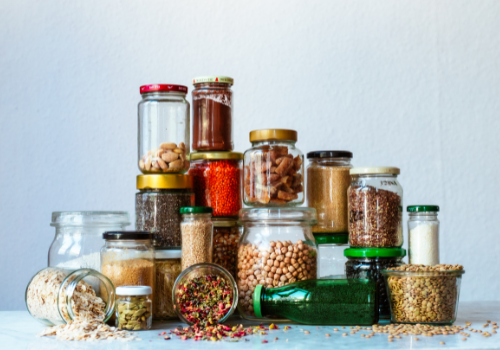

Pantry staples play a crucial role in every kitchen. These essential items form the base of countless recipes. However, many people overlook the benefits of DIY homemade pantry staples. By making these items at home, you can ensure they are fresher and healthier. Consequently, incorporating homemade pantry staples into your kitchen routine can elevate your meals and save money. This guide explores why DIY pantry staples are essential and provides practical recipes for creating your own kitchen staples.
Benefits of DIY Homemade Pantry Staples
DIY Homemade Pantry Staples offer numerous advantages over store-bought options. For starters, homemade pantry staples are often free from preservatives and additives. Moreover, making these items at home allows you to control the quality of ingredients. As a result, pantry staples homemade can be more nutritious and tailored to your preferences. Consequently, you’ll find recipes for homemade pantry staples to be a rewarding addition to your cooking routine.
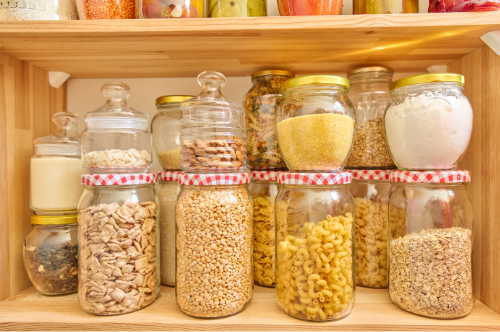
Easy Kitchen Staples You Can Make Yourself
Creating easy kitchen staples you can make yourself is simpler than you might think. Start with basic recipes like homemade pasta sauce or seasoning blends. These recipes often require just a few ingredients and minimal time. Moreover, many DIY pantry recipes can be made in bulk and stored for future use. Consequently, you’ll always have pantry staples to always keep on hand.
Homemade Pantry Staples DIY: What to Make ?
Homemade pantry staples DIY can range from everyday essentials to special treats. Consider making homemade pantry mixes like taco seasoning or baking powder. Homemade mozzarella and other cheese varieties can also be exciting projects. Furthermore, incorporating pantry essentials recipes into your meal prep can simplify cooking. Consequently, you’ll have a variety of favorite homemade pantry staples at your disposal.
Top All-Natural Kitchen Staples That You Can Make Yourself
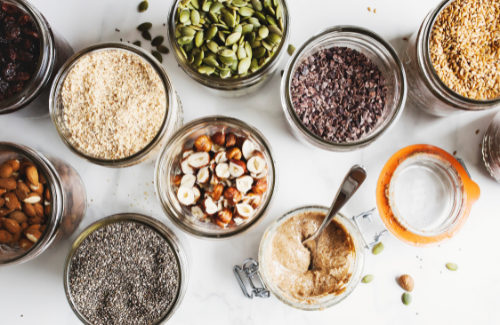
Focusing on top all-natural kitchen staples that you can make yourself ensures you’re avoiding processed ingredients. For example, you can create pantry staples that are healthier & cheaper homemade like almond butter or homemade granola. These options are not only better for your health but also cost-effective. Consequently, opting for kitchen pantry staples you can make at home can lead to a healthier lifestyle.
Recipes You Can Make Using Pantry Staples
Recipes you can make using pantry staples provide endless possibilities for home cooks. From soups and stews to baked goods, having a stock of homemade pantry staples can inspire creativity in the kitchen. For instance, using DIY pantry recipes for basic ingredients like flour or sugar can make your cooking process smoother. Moreover, lot of easy pantry staple recipes can be adapted to suit various dietary needs and preferences.
Pantry Staples Homemade vs. Store-Bought
Homemade pantry staples often outperform their store-bought counterparts in both taste and health benefits. By making items like pantry staples homemade, you ensure they are free from unnecessary additives and preservatives. Homemade instead of store-bought options are also typically more cost-effective. Consequently, switching to pantry staples you can DIY can lead to significant improvements in your kitchen routine.
How to Make Pantry Staples Homemade
Understanding how to make pantry staples homemade is key to fully benefiting from DIY kitchen projects. Start by gathering simple recipes and basic ingredients. For example, DIY pantry recipes for items like sauces, dressings, and seasoning blends can be easily mastered. Moreover, creating top homemade pantry staples ideas and inspiration can make this process enjoyable and rewarding. Consequently, you’ll find it easier to maintain a well-stocked pantry with pantry staples you can make yourself.
DIY pantry staples with easy recipes
Homemade Cheese
DIY Pantry Staples: Simple and fresh cheese that can be used in sandwiches or snacks
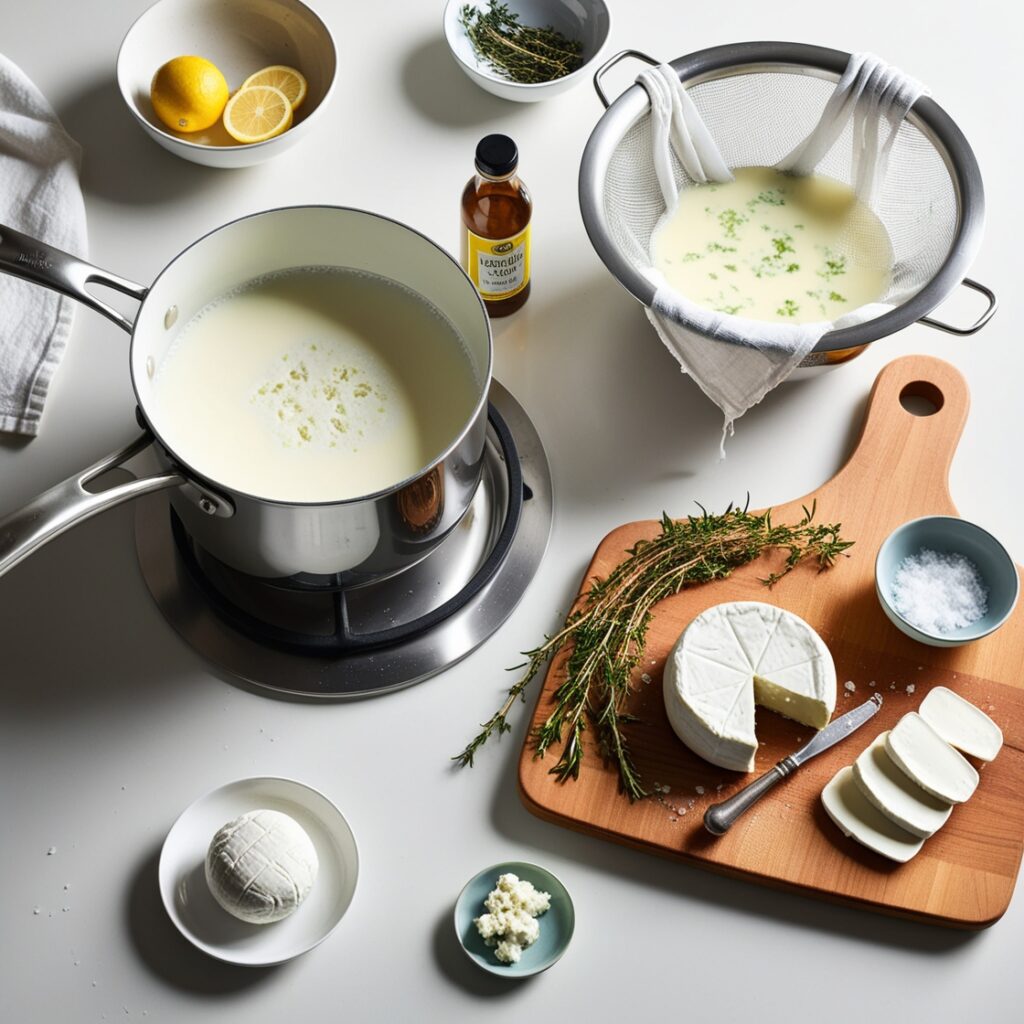
1 liter of whole milk
2 tablespoons lemon juice (or vinegar)
1/4 teaspoon salt (optional)
Herbs or spices (optional for flavoring, e.g., thyme, rosemary)
Instructions:
Heat the Milk: Pour the milk into a large saucepan and slowly heat it over medium heat. Stir occasionally to prevent burning. Heat the milk until it just begins to boil, then turn off the heat.
Add Lemon Juice (or Vinegar): Stir in the lemon juice or vinegar slowly. The milk will start to curdle, separating into curds (solid parts) and whey (liquid). Let it sit for about 10 minutes.
Strain the Curds: Place a clean cheesecloth or thin towel over a strainer or colander. Pour the curdled milk into the cheesecloth, allowing the whey to drain out. Let it sit for about 5–10 minutes, depending on the desired consistency.
Season the Cheese (Optional): After draining, you can mix in salt and herbs for added flavor. Knead the cheese slightly to incorporate the ingredients.
Shape the Cheese: Gather the cheesecloth around the curds and press gently to shape it into a ball or block. Leave it to cool and set for 1-2 hours.
Serve: Once set, your homemade cheese is ready! Slice or crumble it and use it in sandwiches, salads, or as a snack.
Storage Tip: Store in an airtight container in the refrigerator for up to a week.
Homemade Mayonnaise
A healthier, preservative-free option for spreads or dips
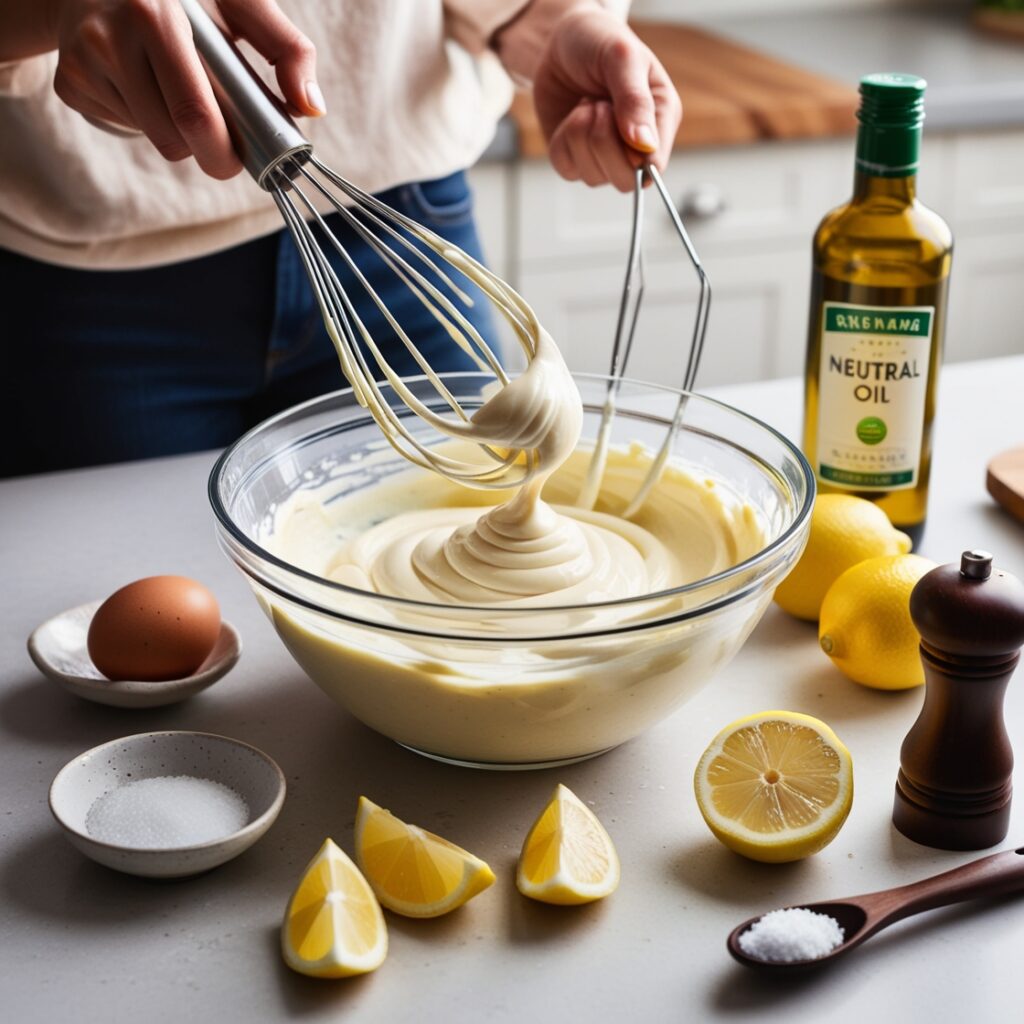
1 large egg (at room temperature)
1 tablespoon Dijon mustard
1 tablespoon lemon juice or white vinegar
1/4 teaspoon salt
1 cup neutral oil (such as sunflower or canola oil)
1/4 teaspoon ground white or black pepper (optional)
1 teaspoon honey or sugar (optional, for a slightly sweet flavor)
Instructions:
Preparation: In a clean mixing bowl or blender, combine the egg, Dijon mustard, lemon juice (or vinegar), and salt.
Mixing: Start blending or whisking on low speed. Slowly drizzle in the oil, a little at a time, while continuously whisking or blending. This helps emulsify the mixture, making it creamy and thick.
Emulsifying: As the mixture begins to thicken, continue adding the oil in a steady stream. The process should take about 5 minutes, resulting in a smooth, thick mayonnaise.
Final Touch: Taste the mayonnaise and adjust the seasoning with more salt, pepper, or lemon juice if needed. Add honey or sugar if you’d like a touch of sweetness.
Storage: Store the homemade mayonnaise in an airtight container in the refrigerator. It can last up to one week.
Apricot Jam
Naturally sweet, perfect for spreading on toast or adding to desserts
2 pounds fresh apricots (about 1 kg), pitted and quartered
1 1/2 cups sugar (adjust to taste)
1/4 cup lemon juice (freshly squeezed)
1 teaspoon vanilla extract (optional)
Instructions:
-Prepare the apricots: Wash the apricots, then halve them to remove the pits. Cut the apricots into quarters for even cooking.
-Mix sugar and apricots: In a large bowl, combine the apricots with the sugar. Let the mixture sit for about 30 minutes to allow the fruit to release its natural juices.
-Cook the mixture: Transfer the apricots and sugar to a large, heavy-bottomed pot. Add the lemon juice and bring the mixture to a boil over medium heat, stirring occasionally.
-Simmer: Once boiling, reduce the heat and let the jam simmer for 20-30 minutes, stirring frequently to avoid burning. The apricots will break down, and the mixture will thicken.
-Check consistency: You can test the jam’s consistency by placing a small amount on a cold plate. -If it thickens and wrinkles when you push it, it’s ready. If not, cook for a bit longer.
-Optional flavoring: Stir in the vanilla extract for added depth of flavor.
-Cool and store: Once the jam reaches the desired consistency, remove it from the heat and allow it to cool slightly. Transfer the jam into sterilized jars and seal tightly. Let the jam cool completely before storing in the fridge.
Homemade Raisin Jam
Sweet and rich, ideal for spreading or adding to recipes
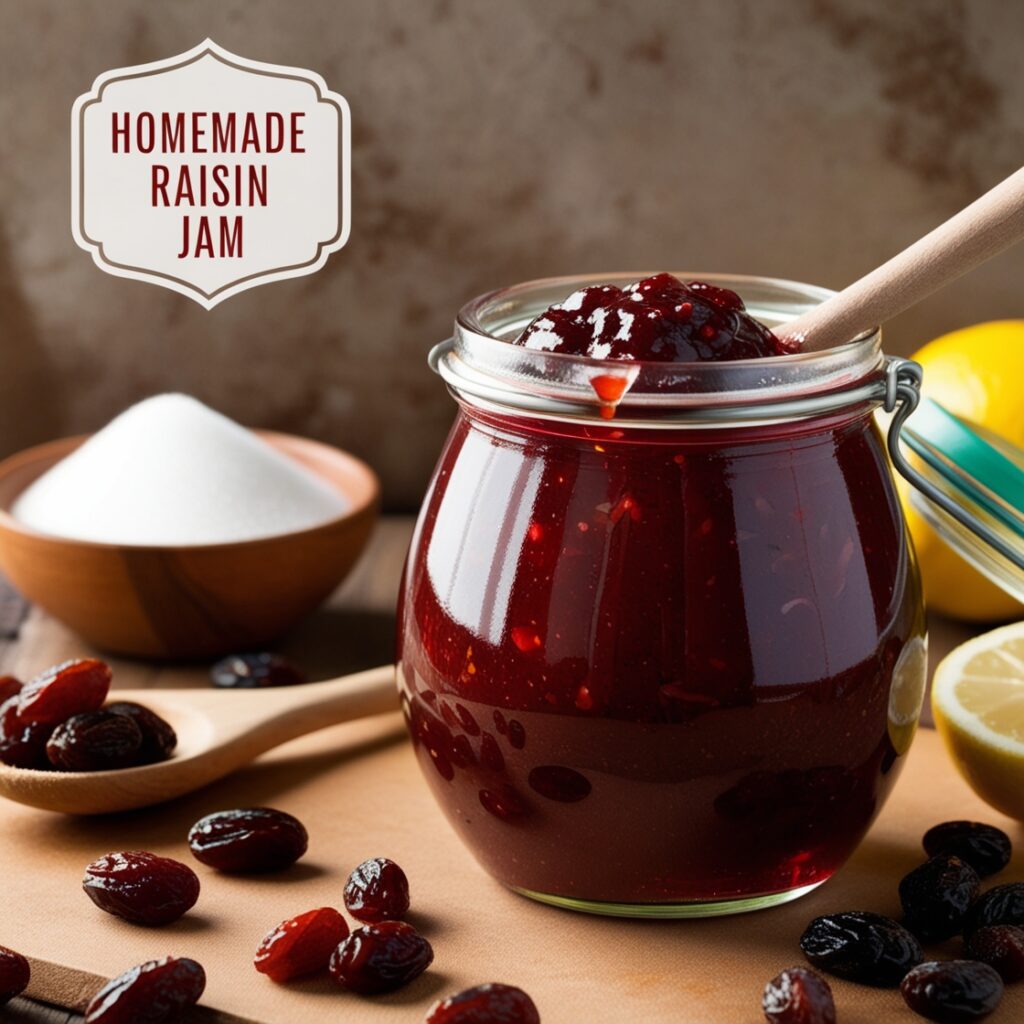
2 cups raisins (any variety)
1 1/2 cups water
1/2 cup sugar (adjust to taste)
2 tablespoons lemon juice (freshly squeezed)
1 teaspoon vanilla extract (optional)
Instructions:
Soak the Raisins: Place the raisins in a bowl and cover with water. Let them soak for about 1-2 hours to soften.
Blend: Once softened, transfer the soaked raisins (along with the soaking water) to a blender or food processor. Blend until smooth and thick.
Cook the Mixture: Pour the raisin puree into a saucepan. Add sugar and lemon juice. Bring the mixture to a boil over medium heat, stirring constantly to prevent sticking.
Simmer: Reduce the heat and let it simmer for 10-15 minutes, stirring frequently until the jam thickens to your desired consistency.
Optional Flavoring: Stir in vanilla extract for a subtle flavor boost.
Cool and Store: Remove from heat and let the jam cool slightly. Transfer it to sterilized jars and seal tightly. Store in the fridge for up to 2 weeks.
Homemade Fig Jam Recipe
Delightfully Sweet and Perfect for Spreads or Recipes
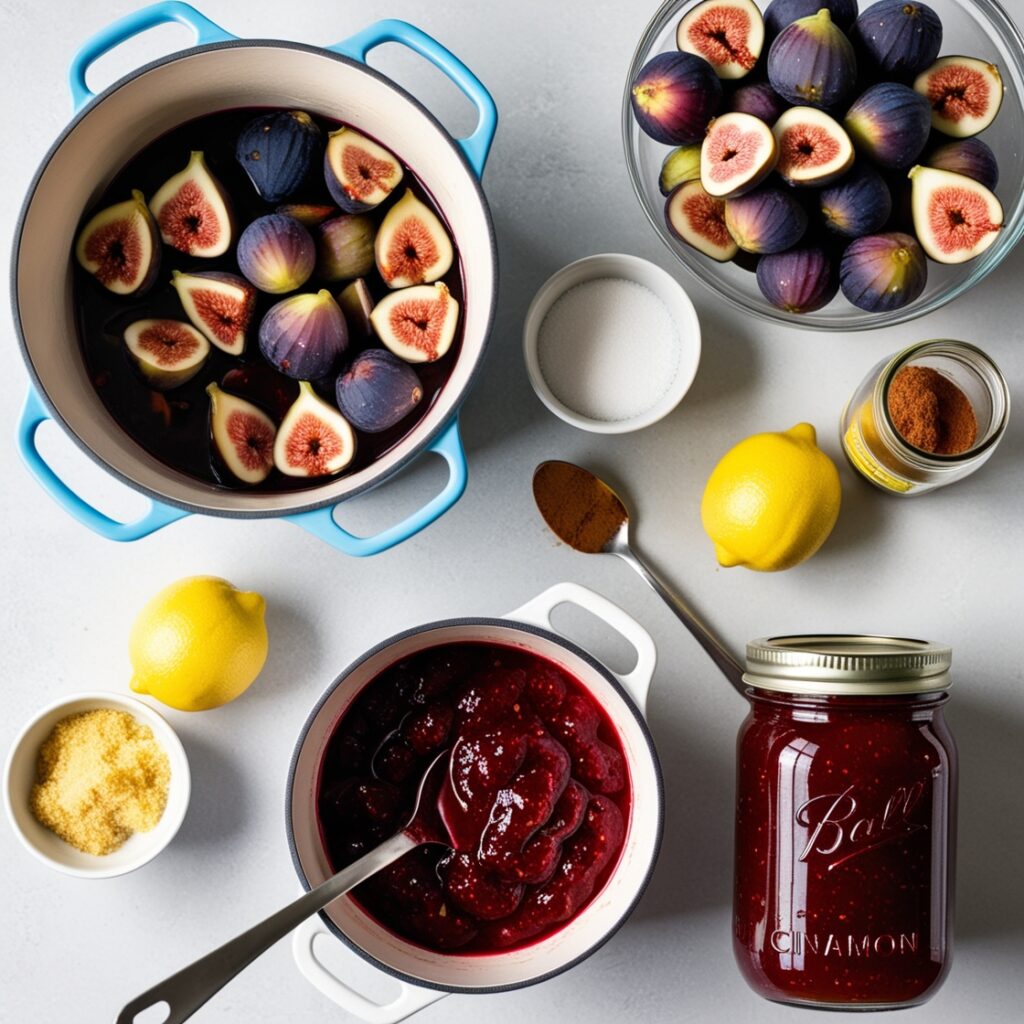
2 pounds fresh figs (about 900 grams), stems removed and chopped
1 1/2 cups granulated sugar
1/4 cup lemon juice (freshly squeezed)
1 teaspoon lemon zest (optional)
1/2 teaspoon ground cinnamon (optional)
1/4 cup water
Instructions:
-Prepare the Figs: Wash and trim the figs. Chop them into small pieces, leaving the skins on.
-Combine Ingredients: In a large pot, combine the chopped figs, sugar, lemon juice, and water. If using, add lemon zest and ground cinnamon for additional flavor.
-Cook the Mixture: Place the pot over medium heat and stir until the sugar is fully dissolved. Bring the mixture to a boil, then reduce the heat and let it simmer gently.
-Simmer: Continue to simmer for about 30-40 minutes, stirring frequently. The figs will break down and the mixture will thicken. You can mash the figs with a spoon or potato masher to achieve your desired texture.
-Check Consistency: To test the jam’s consistency, place a small amount on a cold plate. If it thickens and wrinkles when pushed, it’s ready. If not, cook a bit longer.
-Cool and Store: Remove the pot from the heat and let the jam cool slightly. Pour the hot jam into sterilized jars, leaving about 1/4 inch (6 mm) headspace. Seal the jars tightly.
-Store: Allow the jars to cool completely at room temperature. Store the fig jam in the refrigerator for up to 3 months or process in a hot water bath for longer shelf life.
Fruit Leather
DIY Pantry Staples: A homemade, chewy snack made from blended and dried fruits.

4 cups fresh fruit (such as strawberries, peaches, apples, or a mix)
2 tablespoons honey or maple syrup (optional, for added sweetness)
1 tablespoon lemon juice (to help preserve color and add a tangy flavor)
1/2 teaspoon vanilla extract (optional, for added flavor)
Pinch of salt (optional, to enhance flavor)
Equipment:
Blender or food processor
Baking sheet
Parchment paper
Oven or dehydrator
Instructions:
1. Prepare the Fruit:
Wash and peel (if necessary) the fruits. Remove any seeds or pits.
Cut the fruit into small pieces to make blending easier.
2. Blend the Fruit:
Place the fruit pieces in a blender or food processor.
Add honey or maple syrup, lemon juice, vanilla extract, and a pinch of salt if using.
Blend until the mixture is smooth and completely pureed.
3. Prepare the Baking Sheet:
Line a baking sheet with parchment paper. This will prevent the fruit leather from sticking and make removal easier.
4. Spread the Fruit Mixture:
Pour the fruit puree onto the parchment-lined baking sheet.
Use a spatula to spread it evenly into a thin layer, about 1/8 inch thick. A thin layer ensures that the fruit leather dries evenly.
5. Dry the Fruit Leather:
Using an Oven: Preheat the oven to its lowest setting (usually around 140-160°F or 60-70°C). Place the baking sheet in the oven. Leave the oven door slightly ajar to allow moisture to escape. Dry the fruit leather for 4-6 hours, checking occasionally. It’s ready when it’s no longer sticky and feels like a flexible, dry sheet.
Using a Dehydrator: Follow the manufacturer’s instructions for drying fruit leather. Typically, this will take 6-8 hours at 135°F (57°C).
6. Cool and Cut:
Once the fruit leather is fully dried, let it cool completely.
Remove it from the parchment paper and cut it into strips or squares.
Roll the strips in parchment paper or plastic wrap for easy storage.
7. Store:
Store the homemade fruit leather in an airtight container or resealable bag. It can be kept at room temperature for up to 2 weeks, or in the refrigerator for up to a month.
Béchamel Sauce
A creamy white sauce for pasta, casseroles, or lasagnas
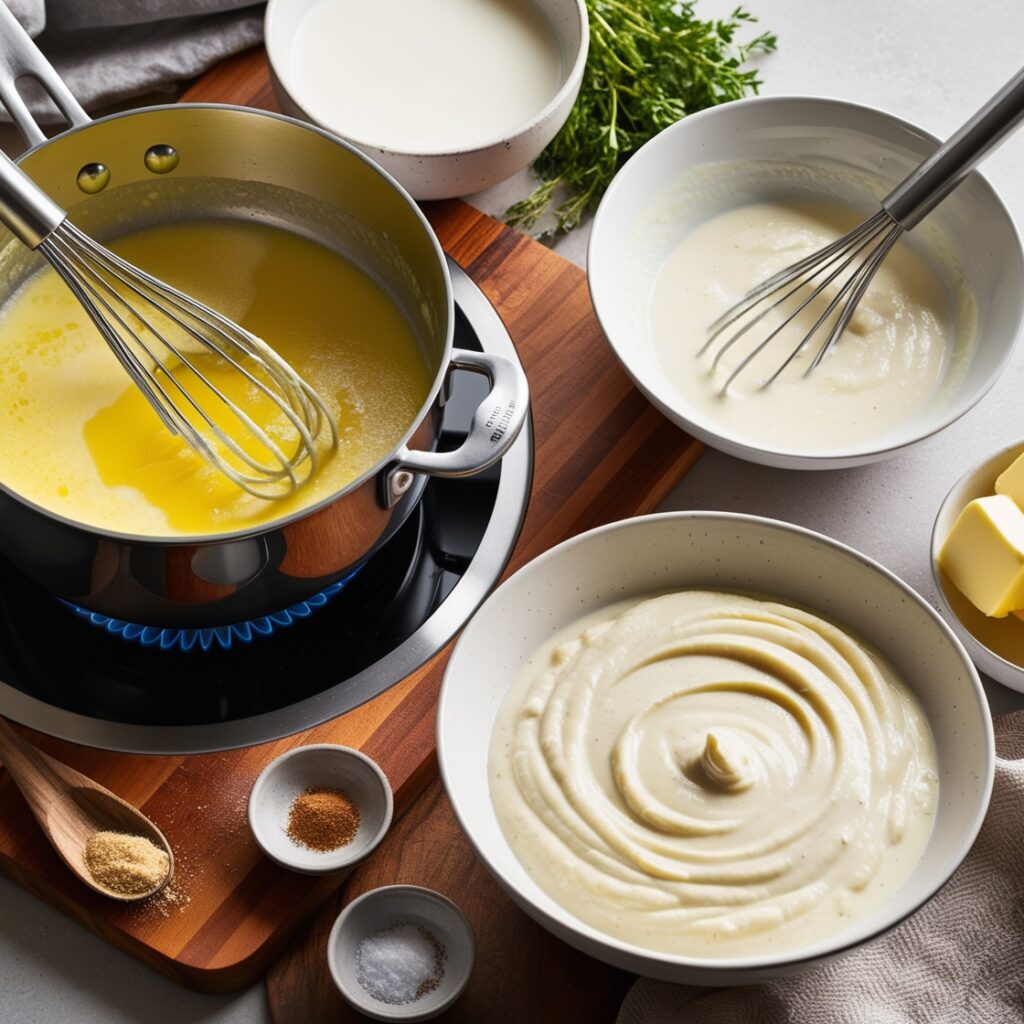
2 tablespoons butter
2 tablespoons all-purpose flour
2 cups milk (whole or 2%)
Salt to taste
White pepper (optional)
A pinch of nutmeg (optional)
Instructions:
-Melt the Butter: In a medium saucepan, melt the butter over medium heat. Make sure it doesn’t brown; you want it just melted.
-Add the Flour: Once the butter is melted, add the flour. Stir continuously with a whisk or wooden spoon for about 1-2 minutes to create a roux. This will cook the flour and remove the raw taste.
-Gradually Add the Milk: Slowly pour in the milk while whisking continuously. This helps to prevent lumps from forming. Keep stirring until the mixture is smooth.
-Thicken the Sauce: Continue to cook the sauce over medium heat, stirring frequently. It will begin to thicken after about 5-7 minutes. You want a creamy, thick consistency.
-Season the Sauce: Once thickened, season with salt, white pepper, and nutmeg (if using). Stir well to combine. Adjust seasoning to taste.
-Serve or Use in Recipes: Your béchamel sauce is now ready to be used! It can be poured over pasta, used in casseroles, or layered in lasagnas.
-Storage: If not using immediately, let it cool and cover with plastic wrap directly on the surface to prevent a skin from forming. Store in the refrigerator for up to 3 days.
Hot Sauce
A mild homemade version for adding a little spice to meals
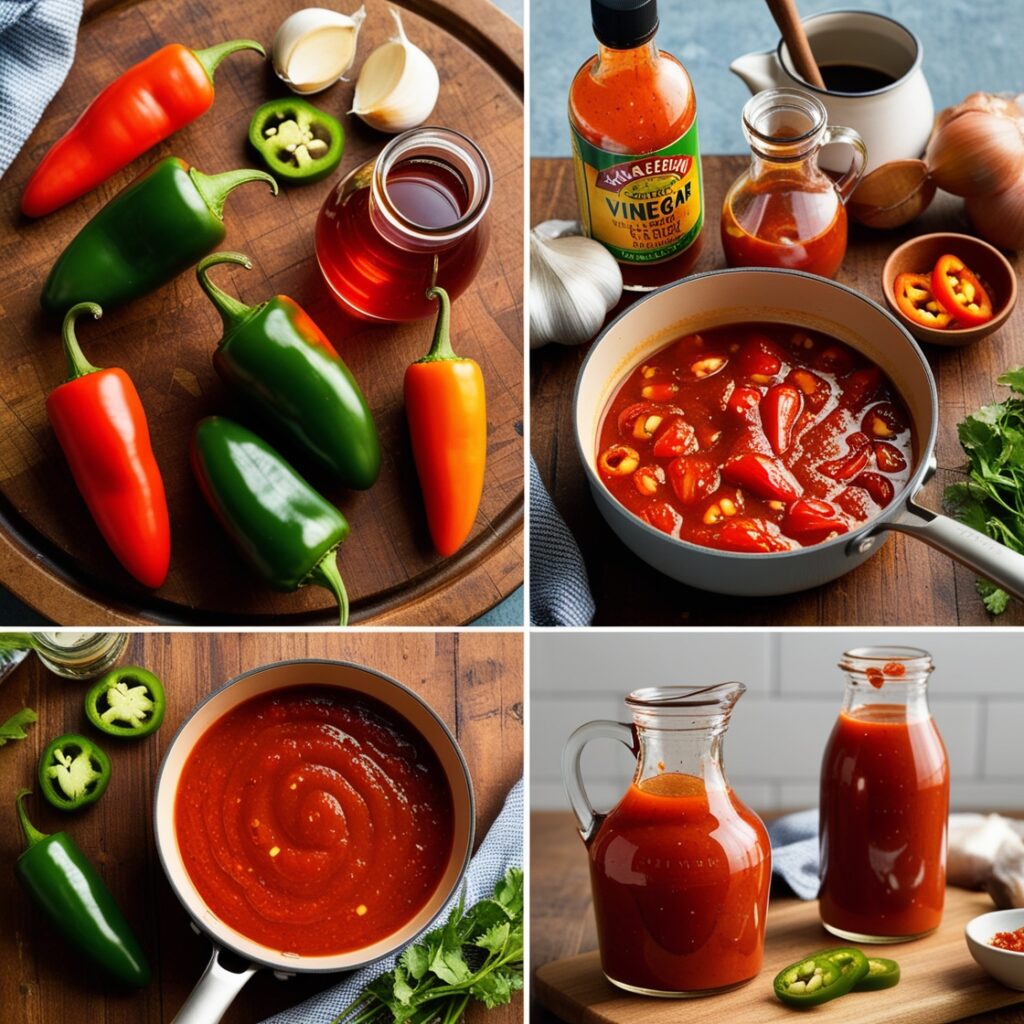
6-8 fresh mild chili peppers (such as jalapeños or Anaheim peppers)
1 cup vinegar (white or apple cider vinegar)
1 teaspoon salt
1 teaspoon sugar (optional, to balance heat)
1 clove garlic (minced, optional)
1/2 cup water
Instructions:
– Prepare the Peppers: Rinse the chili peppers under cold water.
Remove the stems and slice the peppers in half lengthwise. You can remove the seeds for a milder sauce or keep them if you want more heat.
– Combine Ingredients: In a medium saucepan, combine the chopped chili peppers, vinegar, salt, sugar (if using), minced garlic (if using), and water.
Stir the mixture to combine.
– Cook the Mixture: Place the saucepan over medium heat.
Bring the mixture to a gentle simmer, then reduce the heat to low.
Allow it to simmer for about 10-15 minutes, stirring occasionally. This will soften the peppers and allow the flavors to meld.
– Blend the Sauce: After simmering, remove the saucepan from heat and let it cool slightly.
Pour the mixture into a blender. Blend on high until the sauce is smooth and well combined. If the sauce is too thick, you can add a bit more water or vinegar to reach your desired consistency.
– Strain (Optional): If you prefer a smoother sauce, you can strain the mixture through a fine-mesh sieve or cheesecloth to remove any solids. Use a spatula to press the mixture to extract as much liquid as possible.
– Bottle and Store: Transfer the hot sauce to a clean glass bottle or jar. Allow it to cool completely before sealing.
Store the hot sauce in the refrigerator. It can last for several weeks due to the vinegar’s preservative properties.
– Serve: Use your homemade mild hot sauce to add a little spice to your favorite meals, such as tacos, grilled meats, or even as a condiment for sandwiches.
Granola
A mix of oats, nuts, and dried fruits, perfect for breakfast bowls
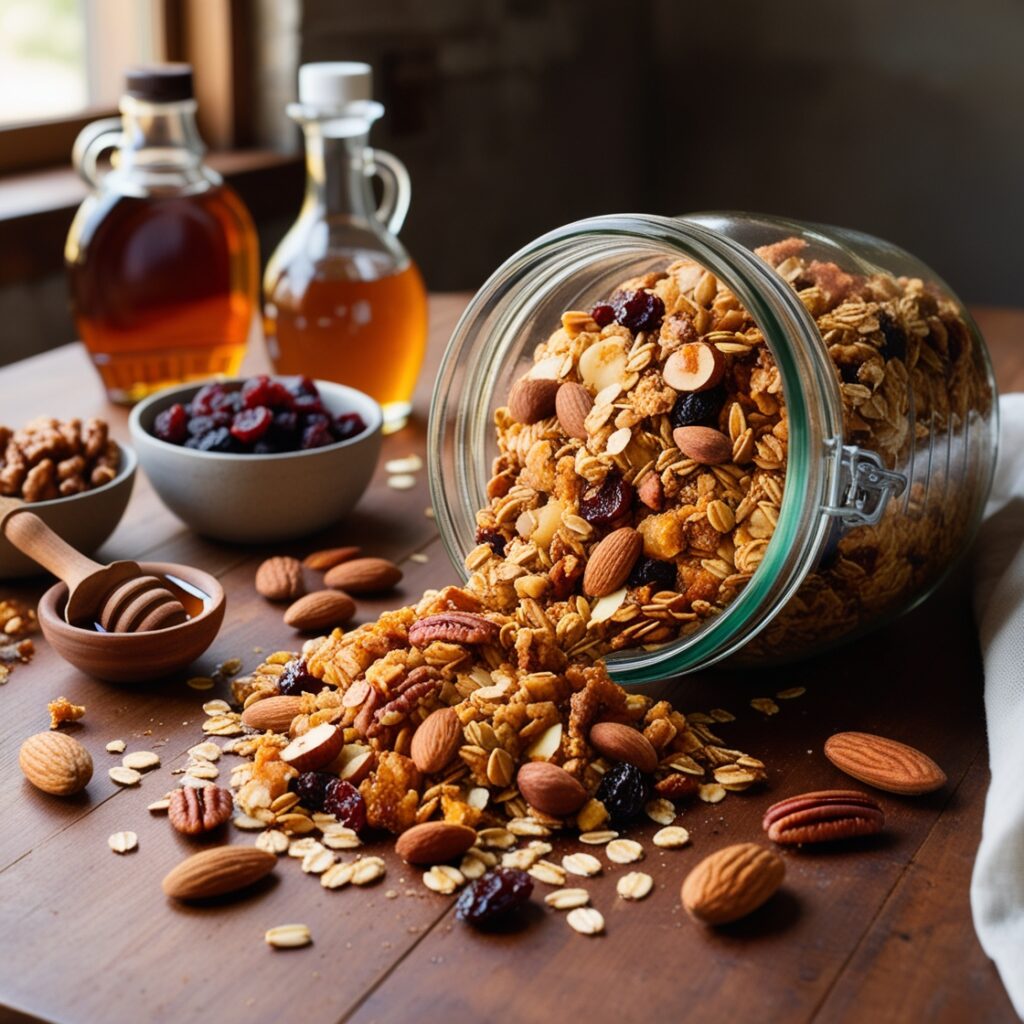
2 cups rolled oats (old-fashioned oats work best)
1 cup mixed nuts (such as almonds, walnuts, pecans, or hazelnuts, roughly chopped)
1/2 cup seeds (such as sunflower seeds, pumpkin seeds, or chia seeds)
1/2 cup dried fruits (such as raisins, cranberries, apricots, or dates, chopped)
1/4 cup honey or maple syrup (for natural sweetness)
1/4 cup coconut oil (or olive oil, melted)
1 teaspoon vanilla extract
1/2 teaspoon cinnamon (optional, for extra flavor)
A pinch of salt
Instructions:
1. Preheat the Oven: Preheat your oven to 325°F (160°C). Line a large baking sheet with parchment paper for easy cleanup.
2. Mix the Dry Ingredients: In a large bowl, combine rolled oats, chopped nuts, and seeds. You can mix and match the types of nuts and seeds depending on your preferences. Add the cinnamon and salt, then stir everything together to ensure the ingredients are evenly distributed.
3. Prepare the Wet Ingredients: In a small saucepan, melt the coconut oil (or olive oil) over low heat. Once melted, remove from heat and stir in the honey or maple syrup and vanilla extract until well combined. This mixture will help bind the granola and give it its signature crunchy texture.
4. Combine the Wet and Dry Ingredients: Pour the wet ingredients over the dry ingredients in the bowl. Stir well to ensure that all the oats, nuts, and seeds are fully coated in the mixture. This will give your granola an even sweetness and crispiness when it bakes.
5. Spread on the Baking Sheet: Spread the granola mixture evenly across the prepared baking sheet. Press it down lightly with a spatula to form an even layer. This will help the granola bake evenly.
6. Bake the Granola: Place the baking sheet in the preheated oven and bake for 20-25 minutes or until the granola turns golden brown. Stir the granola halfway through baking to ensure even browning. Be careful not to let it burn, especially towards the end of the baking time.
7. Add the Dried Fruits: After the granola is baked and slightly cooled (but still warm), add the chopped dried fruits like raisins, cranberries, or apricots. Stir the fruits into the warm granola. This step ensures the fruits remain chewy and don’t get too crispy in the oven.
8. Cool Completely: Allow the granola to cool completely on the baking sheet. As it cools, it will harden and form crunchy clusters. For larger clusters, avoid stirring it too much while it cools.
9. Store the Granola: Once cooled, transfer the granola to an airtight container. It can be stored at room temperature for up to two weeks, or in the fridge for longer shelf life.
Serving Suggestions:
Enjoy the granola over yogurt, in a breakfast bowl with fresh fruit and milk, or simply as a snack on its own. You can also sprinkle it over smoothie bowls or salads for added crunch!
This granola recipe is versatile, easy to customize with your favorite nuts and dried fruits, and perfect for making ahead for quick, nutritious breakfasts!
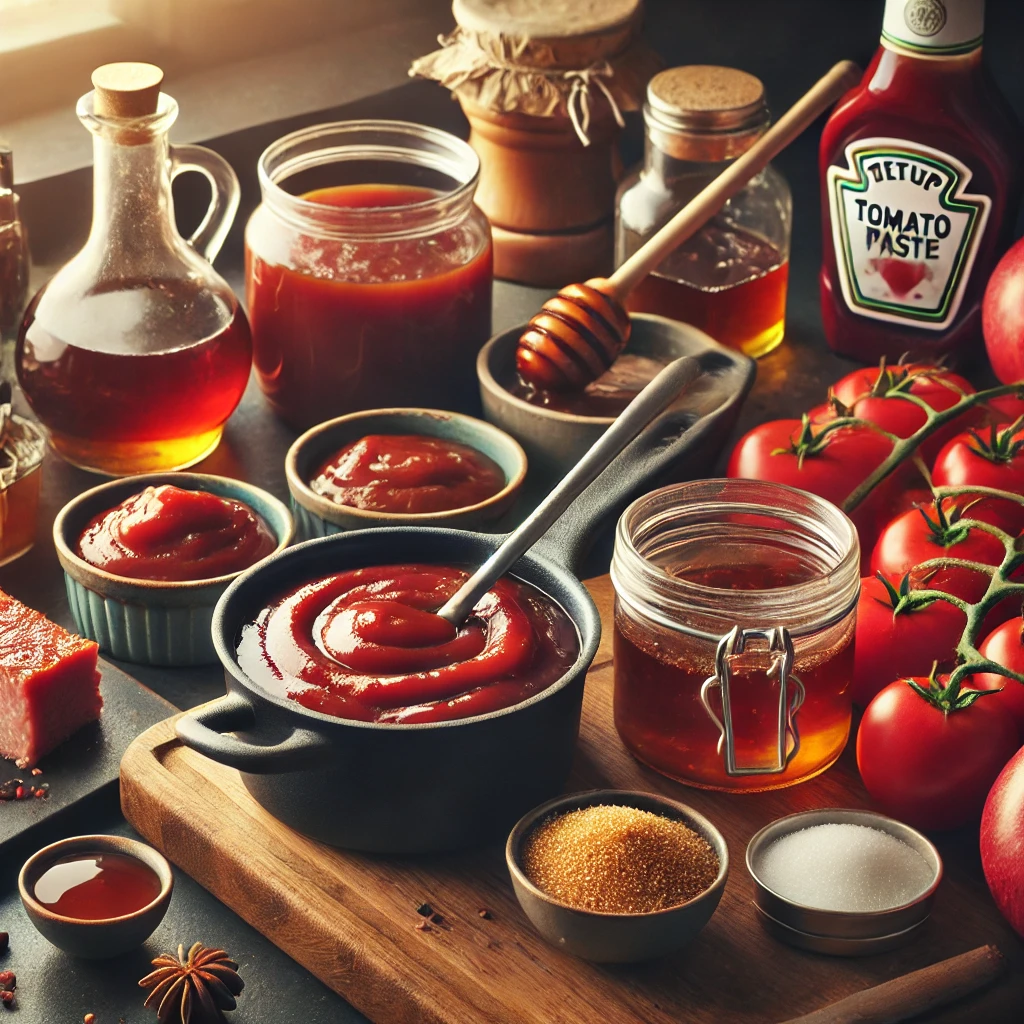
BBQ Sauce
DIY Pantry Staples: Homemade barbecue sauce with a unique flavor profile

1. Tomato Base:
– 1 cup ketchup (preferably without high-fructose corn syrup for a healthier option)
– 1/4 cup tomato paste (for added thickness and depth)
2. Sweeteners:
– 1/4 cup brown sugar (adds a molasses-rich sweetness)
– 2 tablespoons honey or maple syrup (for a touch of natural sweetness)
3. Acidic Elements:
– 1/4 cup apple cider vinegar (gives a tangy bite and balances the sweetness)
– 2 tablespoons lemon juice (adds brightness and a fresh tang)
4. Liquid Smoke or Smoky Flavor:
– 1 teaspoon liquid smoke (adds a smoky BBQ flavor without a grill)
– Optional: 1/4 teaspoon smoked paprika (for an extra layer of smokiness)
5. Savory and Spicy Elements:
– 2 tablespoons Worcestershire sauce (adds umami and richness)
– 1 teaspoon Dijon mustard (for a slight tang and complexity)
– 1 teaspoon garlic powder (or 2 cloves fresh garlic, minced)
– 1 teaspoon onion powder
– 1/2 teaspoon chili powder (optional, for heat)
– 1/4 teaspoon cayenne pepper (for an extra kick)
6. Salt and Pepper:
– 1/2 teaspoon salt (adjust to taste)
– 1/4 teaspoon freshly ground black pepper
7. Optional Add-ins for a Unique Flavor Profile:
– 2 tablespoons bourbon (for a smoky, sweet complexity)
– 1 tablespoon soy sauce (adds a rich, umami flavor)
– 1 tablespoon molasses (for extra depth and sweetness)
Instructions:
1. Prepare the Base:
– In a medium saucepan, combine « ketchup » and « tomato paste » over medium heat. Stir together to form a smooth base. The tomato paste will thicken the sauce, giving it a more robust consistency.
2. Add the Sweeteners:
– Stir in the « brown sugar » and « honey or maple syrup. Continue stirring until the sugars fully dissolve into the tomato base. The sweetness is key to balancing the tang and spice in your BBQ sauce.
3. Incorporate the Acid:
– Add the « apple cider vinegar » and « lemon juice » to the sauce. Stir well to blend. The acidic elements will help cut through the richness of the tomato and sweeteners, adding a sharp, tangy flavor to the sauce.
4. Introduce the Smoky Notes:
– Pour in « liquid smoke » (and « smoked paprika », if using). This will give your BBQ sauce that signature smoky, grilled flavor without needing to cook over an open flame. Stir to blend the smoky flavors evenly throughout the sauce.
5. Add Savory Depth:
– Stir in the « Worcestershire sauce », « Dijon mustard », « garlic powder », and « onion powder ». These ingredients give the sauce its rich, savory notes that deepen the overall flavor profile. Make sure to mix everything thoroughly so no clumps of seasoning remain.
6. Spice It Up:
– Add the « chili powder » and « cayenne pepper » if you want some heat. Adjust the quantities to suit your spice tolerance. For a milder sauce, you can omit the cayenne or chili powder entirely. Stir the spices in well to distribute the heat evenly.
7. Season with Salt and Pepper:
– Add « salt » and « black pepper » to taste. Start with the recommended amounts and adjust according to your preference. The salt will enhance all the flavors, while pepper adds a subtle bite.
8. Optional Ingredients for a Unique Twist:
– If you want to experiment with a more complex flavor, add « bourbon », « soy sauce », or « molasses. These ingredients will create a BBQ sauce with layers of rich, smoky, and sweet flavors. Stir well to ensure everything is incorporated smoothly.
9. Simmer to Perfection:
– Reduce the heat to low and let the sauce simmer gently for about 20-30 minutes. Stir occasionally to prevent the sauce from sticking to the bottom of the pan. The sauce will thicken and the flavors will meld together during this time.
10. Taste and Adjust:
– After simmering, taste the BBQ sauce and adjust the seasoning if necessary. You can add more vinegar for tang, more sugar for sweetness, or extra spices for heat. Stir and simmer for a few more minutes if you make any adjustments.
11. Cool and Store:
– Once the sauce has reached your desired consistency and flavor, remove it from the heat and let it cool. Transfer the BBQ sauce to an airtight container. You can store it in the refrigerator for up to 2 weeks.
Usage Suggestions:
– Use the BBQ sauce as a glaze for ribs, chicken, or grilled vegetables.
– Brush it onto burgers or use it as a dipping sauce for fries, chicken tenders, or nuggets.
– Mix it into pulled pork or use as a topping for BBQ pizza.
This homemade BBQ sauce recipe gives you the flexibility to adjust flavors to your liking, allowing you to create a tangy, smoky, and sweet sauce perfect for your family!
Vinaigrette
DIY Pantry Staples: A Homemade vinaigrette for salads and marinades
3/4 cup extra virgin olive oil (or any other good-quality oil of your choice)
1/4 cup vinegar (choose from balsamic, red wine, white wine, apple cider, or rice vinegar depending on your flavor preference)
1 tablespoon Dijon mustard (for a smooth, tangy texture)
1 garlic clove, minced (optional, for added depth of flavor)
1 tablespoon honey or maple syrup (for a touch of sweetness, optional)
1 teaspoon salt (adjust to taste)
1/2 teaspoon freshly ground black pepper (adjust to taste)
1 teaspoon dried herbs (like oregano, thyme, or basil; optional, for extra flavor)
1/2 teaspoon lemon juice or zest (optional, to brighten the vinaigrette)
Instructions:
1. Prepare Your Ingredients: Gather all your ingredients. You can experiment with different vinegars and oils depending on your taste preference or what you have on hand.
If using garlic, mince it finely to ensure it blends well in the dressing.
2. Combine the Vinegar and Mustard: In a small bowl or jar, pour the vinegar of your choice.
Add the Dijon mustard and whisk them together until fully combined. This mustard acts as an emulsifier, helping to blend the oil and vinegar.
3. Add Sweetener (Optional): If you prefer your vinaigrette with a touch of sweetness, add in 1 tablespoon of honey or maple syrup.
Whisk until it’s fully dissolved into the vinegar-mustard mixture.
4. Add Garlic and Lemon (Optional): For a more flavorful vinaigrette, add the minced garlic and lemon juice or zest at this stage.
Mix everything together to distribute the flavors evenly.
5. Gradually Incorporate the Oil: While continuously whisking the vinegar mixture, slowly drizzle in the olive oil. Whisking helps to emulsify the oil and vinegar, creating a smooth, slightly thickened texture.
If you’re using a jar with a lid, you can simply add the oil and shake vigorously to mix.
6. Season with Salt, Pepper, and Herbs: Once the oil is incorporated, season the vinaigrette with salt and freshly ground black pepper to taste.
You can also add dried herbs like oregano, thyme, or basil for extra depth of flavor.
Taste the vinaigrette and adjust the seasoning or acidity by adding more salt, pepper, or lemon juice as needed.
7. Store or Serve: If you’re not using the vinaigrette immediately, transfer it to a clean jar with a lid. Shake well before using, as the oil and vinegar will naturally separate over time.
This vinaigrette can be stored in the refrigerator for up to 1 week. If it solidifies due to the olive oil, bring it to room temperature and shake before using.
8. Serving Suggestions: Use this vinaigrette to dress green salads, roasted vegetables, or grain salads like quinoa or couscous.
It also works well as a marinade for chicken, fish, or tofu before grilling or baking.
For a heartier salad, toss the vinaigrette with cooked pasta, chickpeas, or lentils for a nutritious meal.
Customization Ideas:
-For a Creamier Vinaigrette: Add 1-2 tablespoons of Greek yogurt or mayo.
-For a Zesty Flavor: Add 1 teaspoon of freshly grated ginger or shallots.
-For a Smoky Flavor: Add a pinch of smoked paprika or chipotle powder.
This homemade vinaigrette is incredibly versatile and can be customized to suit your taste preferences. Plus, it’s made from simple pantry staples, making it an easy and healthy option for adding flavor to your meals.
Pasta Sauces
DIY Pantry Staples: A Homemade alfredo or pesto sauces for pasta dishes

Ingredients:
Butter: 1/2 cup (1 stick), unsalted
Garlic: 2-3 cloves, minced (optional for extra flavor)
Heavy Cream: 1 1/2 cups (for creaminess)
Parmesan Cheese: 1 1/2 cups, freshly grated (use high-quality Parmesan for best flavor)
Cream Cheese: 2 ounces (optional, helps thicken the sauce)
Salt: 1/2 teaspoon (adjust to taste)
Black Pepper: 1/4 teaspoon (freshly ground, adjust to taste)
Parsley: 1 tablespoon, chopped (for garnish, optional)
Pasta: Any pasta of your choice (fettuccine, penne, or linguine)
Instructions for Homemade alfredo sauce
Melt the Butter: In a medium saucepan, melt the butter over medium heat. If you want to add garlic for extra flavor, sauté the minced garlic in the melted butter for 30 seconds until fragrant, but not browned.
Add the Heavy Cream: Pour in the heavy cream and stir well. Let the cream and butter mixture simmer gently for 2-3 minutes. Stir occasionally to prevent the cream from sticking to the bottom of the pan.
Incorporate the Parmesan and Cream Cheese: Gradually whisk in the Parmesan cheese and cream cheese (if using). Stir constantly until the cheeses melt and combine with the cream to form a smooth sauce. This should take about 3-4 minutes. If the sauce is too thick, you can add a little more cream or pasta water to thin it out.
Season with Salt and Pepper: Add salt and black pepper to taste. Start with the recommended amounts and adjust according to your preference. Stir everything together to ensure even seasoning.
Simmer and Thicken: Let the Alfredo sauce simmer on low heat for another 3-5 minutes until it thickens to your desired consistency. Stir occasionally to prevent it from burning or sticking to the pan.
Toss with Pasta: Cook your chosen pasta according to package instructions. Drain and toss the pasta directly into the Alfredo sauce, ensuring it is fully coated.
Garnish and Serve: Garnish with freshly chopped parsley and extra Parmesan cheese if desired. Serve immediately with garlic bread or a side salad.
2. Homemade Pesto Sauce
Ingredients:
Fresh Basil Leaves: 2 cups, packed (preferably sweet basil)
Pine Nuts: 1/4 cup (you can substitute walnuts or almonds if desired)
Garlic: 2-3 cloves, peeled
Parmesan Cheese: 1/2 cup, freshly grated
Olive Oil: 1/2 cup (extra virgin for the best flavor)
Lemon Juice: 1 tablespoon (optional, for brightness)
Salt: 1/2 teaspoon (adjust to taste)
Black Pepper: 1/4 teaspoon, freshly ground
Pasta: Use with any pasta like spaghetti, linguine, or penne
Instructions for Homemade Pesto Sauce:
Toast the Pine Nuts (Optional): For a richer flavor, lightly toast the pine nuts in a dry pan over medium heat for 2-3 minutes until they turn golden brown. Stir frequently to prevent burning. Remove from heat and let them cool.
Blend the Basil and Garlic: In a food processor or blender, add the fresh basil leaves and garlic cloves. Pulse a few times to break down the basil and garlic.
Add the Pine Nuts and Parmesan: Add the cooled pine nuts and freshly grated Parmesan cheese to the food processor. Blend everything together until a coarse mixture forms.
Drizzle in the Olive Oil: While the food processor is running, slowly drizzle in the olive oil. This will help emulsify the ingredients into a smooth, creamy pesto sauce. Continue blending until the pesto reaches your desired consistency. For a thinner pesto, add a little more olive oil.
Season the Pesto: Add salt, black pepper, and lemon juice (if using). Pulse a few more times to combine the flavors. Taste the pesto and adjust the seasoning if needed.
Toss with Pasta: Cook your pasta according to package instructions, drain, and toss it with the pesto sauce. If the pesto is too thick, you can thin it out with a little reserved pasta water or olive oil.
Serve and Enjoy: Serve your pesto pasta immediately with extra Parmesan cheese on top. You can also use pesto as a spread for sandwiches, on pizza, or as a dip for bread.
Quick Tips for Both Sauces:
- Storage: Both Alfredo and Pesto sauces can be stored in airtight containers in the refrigerator. Alfredo sauce can last up to 5 days, and pesto sauce can last about a week.
- Freezing: Pesto can be frozen in small batches, such as in ice cube trays, for quick and easy use later. Alfredo sauce does not freeze well due to its dairy content.
- Both the Alfredo and Pesto sauces are versatile and can be customized to suit your preferences. Whether you prefer the rich, creamy texture of Alfredo or the fresh, herby punch of pesto, these homemade sauces elevate any pasta dish!
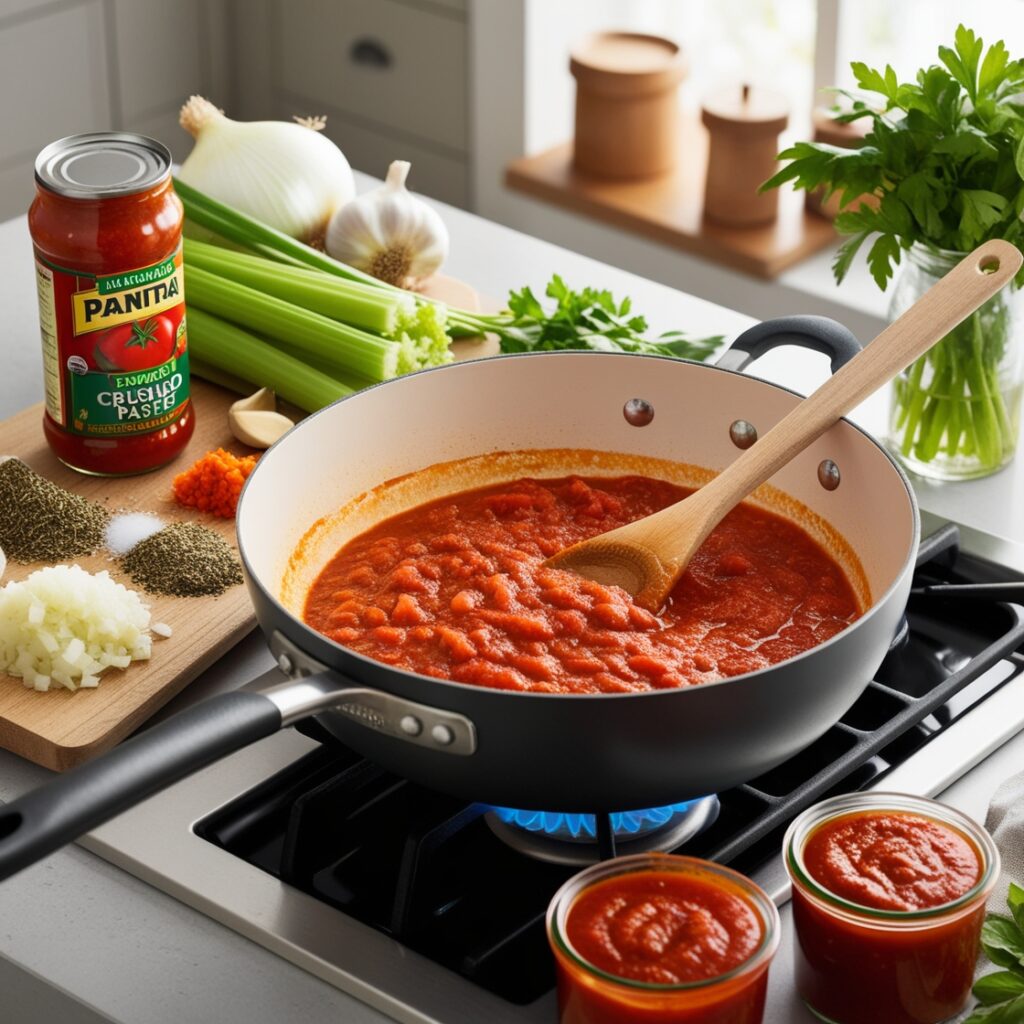
Spaghetti Sauce
Homemade marinara or spaghetti sauce for pasta dishes
Olive Oil: 2 tablespoons
Garlic: 4 cloves, minced
Onion: 1 medium, finely chopped
Carrot: 1 medium, finely grated (optional for sweetness)
Celery: 1 stalk, finely chopped (optional for depth of flavor)
Tomatoes: 1 can (28 ounces) crushed tomatoes or 6-8 fresh tomatoes, peeled and chopped
Tomato Paste: 2 tablespoons (for thickening and rich flavor)
Dried Oregano: 1 teaspoon
Dried Basil: 1 teaspoon
Sugar: 1 teaspoon (to balance acidity, adjust to taste)
Salt: 1 teaspoon (to taste)
Black Pepper: 1/2 teaspoon (freshly ground, to taste)
Red Pepper Flakes: 1/4 teaspoon (optional, for heat)
Fresh Basil: 1/4 cup, chopped (optional, for garnish)
Fresh Parsley: 2 tablespoons, chopped (optional, for garnish)
Water or Vegetable Broth: 1/2 cup (to adjust consistency, if needed)
Instructions:
Prepare Ingredients: Peel and finely chop the onion and garlic.
If using fresh tomatoes, peel them (blanching them in boiling water for 1-2 minutes can help with peeling), and chop them.
Finely grate the carrot and chop the celery (if using).
Heat Olive Oil: In a large saucepan or skillet, heat the olive oil over medium heat.
Sauté Vegetables:
Add the chopped onions, grated carrot, and celery (if using) to the pan.
Sauté for about 5-7 minutes, until the onions are translucent and the vegetables are softened.
Add Garlic: Add the minced garlic to the pan and sauté for another 1-2 minutes, until fragrant. Be careful not to burn the garlic.
Incorporate Tomatoes: Add the crushed tomatoes (or chopped fresh tomatoes) and tomato paste to the pan.
Stir to combine all ingredients.
Season the Sauce: Add the dried oregano, dried basil, sugar, salt, black pepper, and red pepper flakes (if using) to the sauce.
Stir well to incorporate the seasonings.
Simmer the Sauce: Bring the sauce to a gentle simmer.
Reduce the heat to low and let it simmer uncovered for 30-45 minutes, stirring occasionally.
If the sauce is too thick, add water or vegetable broth, a little at a time, until the desired consistency is reached.
Adjust Flavor: Taste the sauce and adjust seasoning as needed. You may want to add a bit more sugar, salt, or herbs to taste.
Add Fresh Herbs (Optional): If using, stir in the fresh basil and parsley just before serving to add a burst of fresh flavor.
Serve: Serve the marinara sauce hot over your favorite pasta, such as spaghetti. It also pairs well with meatballs, lasagna, or as a dipping sauce for breadsticks.
Store Leftovers:
Allow the sauce to cool completely before transferring it to an airtight container. Store in the refrigerator for up to 1 week or freeze for up to 3 months. Reheat thoroughly before using.
Apple Sauce
Naturally sweet and perfect for kids’ lunches or snacks

Apples: 6-8 medium-sized (preferably sweet varieties like Fuji, Gala, or Honeycrisp)
Water: 1 cup
Lemon Juice: 2 tablespoons (optional, for added freshness and to prevent browning)
Ground Cinnamon: 1/2 teaspoon (optional, for flavor)
Sugar: 2-3 tablespoons (optional, depending on the sweetness of the apples)
Instructions:
Prepare the Apples:
Peel the apples using a vegetable peeler.
Core and slice the apples into chunks. If you prefer, you can also cut the apples into smaller pieces for quicker cooking.
Cook the Apples:
In a large pot, add the apple chunks and 1 cup of water.
If using lemon juice, add it to the pot. This helps to maintain the color and adds a touch of brightness to the flavor.
Optionally, add ground cinnamon and sugar if you prefer a spiced and sweeter apple sauce. Adjust the sugar according to the sweetness of the apples and your taste preference.
Simmer the Apples:
Bring the pot to a boil over medium-high heat.
Once boiling, reduce the heat to low and cover the pot with a lid.
Let the apples simmer for about 20-30 minutes, stirring occasionally, until the apples are very soft and starting to break down. The exact cooking time will depend on the size of the apple chunks and the variety used.
Mash or Puree the Apples:
Once the apples are soft, you can use a potato masher to mash them directly in the pot for a chunky sauce.
For a smoother texture, use an immersion blender to puree the apples in the pot. Alternatively, transfer the cooked apples in batches to a blender or food processor and blend until smooth.
Adjust Consistency and Flavor:
If the apple sauce is too thick, you can add a little more water to reach your desired consistency.
Taste the apple sauce and adjust sweetness or spice levels if needed by adding more sugar or cinnamon.
Cool and Store:
Allow the apple sauce to cool slightly before transferring it to containers.
Store the apple sauce in an airtight container in the refrigerator for up to 1 week.
For longer storage, you can freeze the apple sauce in freezer-safe containers or bags for up to 3 months. Thaw in the refrigerator before using.
Serving Suggestions:
Serve the apple sauce as a healthy snack or side dish for kids’ lunches.
Use it as a topping for yogurt or oatmeal.
Incorporate it into baking recipes as a natural sweetener or moisture enhancer.
Mayo Alternatives
Homemade alternatives like avocado spread for sandwiches
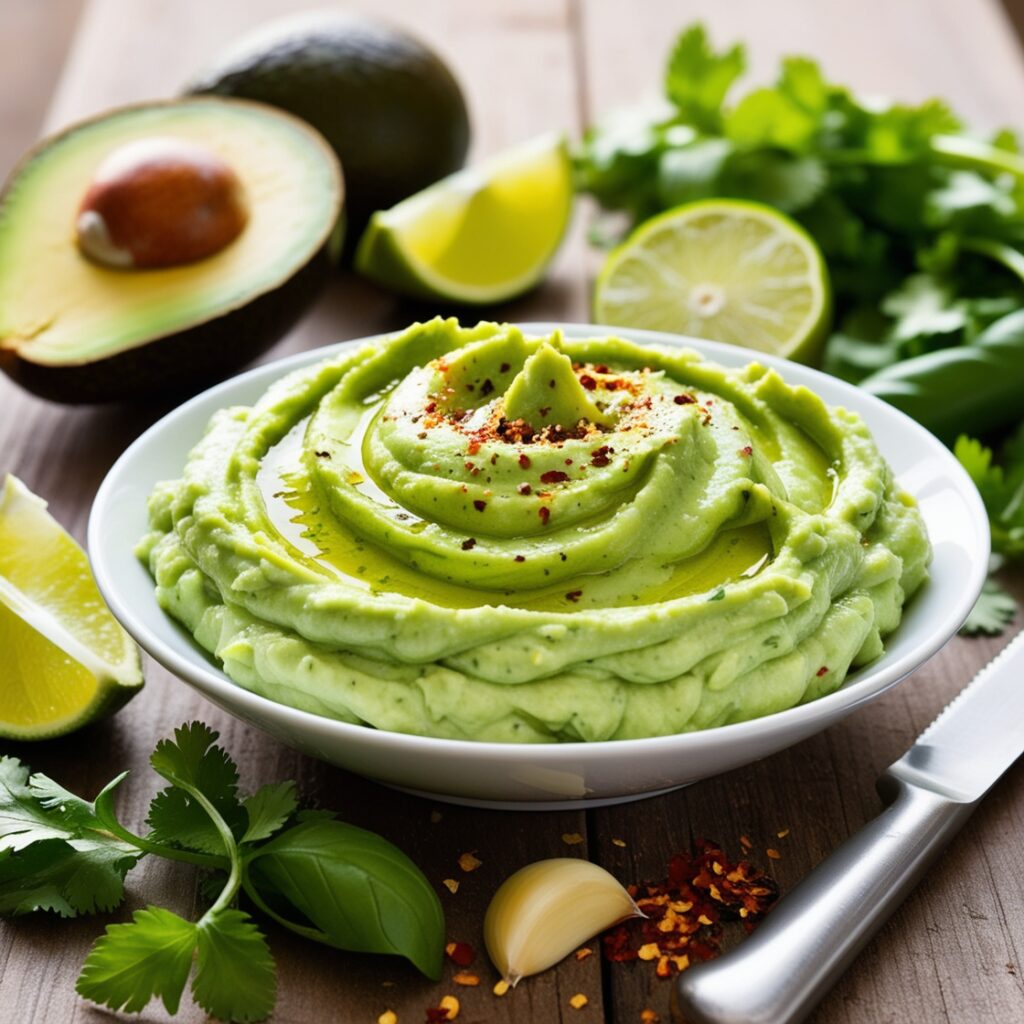
2 ripe avocados
1 tablespoon lime juice (freshly squeezed)
1 small garlic clove, minced (optional)
Salt to taste
Pepper to taste
Optional add-ins:
1 tablespoon Greek yogurt for creaminess
Fresh herbs like cilantro or basil for added flavor
A pinch of red pepper flakes for heat
Instructions:
1. Prepare the Avocados:
Start by selecting ripe avocados. They should yield slightly to gentle pressure.
Cut the avocados in half lengthwise. Remove the pit by carefully twisting it out with a knife or spoon.
Scoop the flesh from the avocados into a mixing bowl.
2. Mash the Avocados:
Using a fork or a potato masher, mash the avocado flesh to your desired consistency. You can make it smooth or leave it a bit chunky, depending on your preference.
3. Add Lime Juice:
Squeeze in the lime juice. This adds flavor and helps prevent the avocado from browning.
4. Incorporate Garlic (Optional):
If you like a garlicky flavor, add the minced garlic to the bowl. Mix it in well.
5. Season the Spread:
Sprinkle in salt and pepper to taste. Start with a small amount and adjust according to your preference.
6. Mix in Optional Ingredients:
If using, stir in Greek yogurt for creaminess, or add fresh herbs for a flavor boost. If you prefer a little heat, add red pepper flakes.
7. Taste and Adjust:
Taste the spread and make any necessary adjustments. You can add more lime juice for tanginess, salt for flavor, or extra herbs for freshness.
8. Serve or Store:
Spread the avocado mixture on your favorite bread, wraps, or use it as a dip for vegetables.
If you’re not using it immediately, transfer the spread to an airtight container and press plastic wrap directly onto the surface to minimize air exposure. Store in the refrigerator for up to 2 days.
Tips:
To enhance the flavor further, consider adding spices like cumin or smoked paprika.
This avocado spread is not just great for sandwiches; it can also be used as a topping for burgers or as a dip for chips and veggies.
Cream Cheese
Homemade cream cheese for spreads and baking
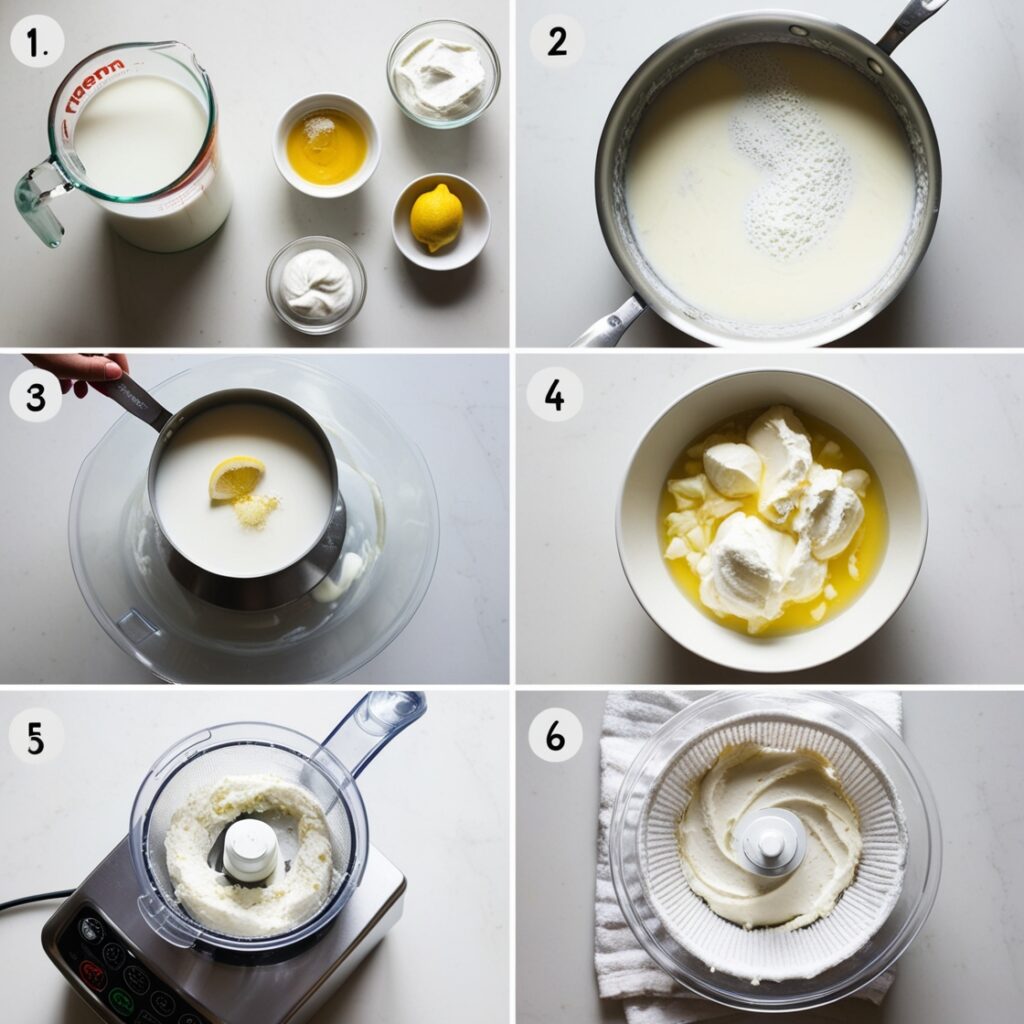
1 liter (4 cups) whole milk
1/2 cup heavy cream
1/4 cup plain yogurt or buttermilk (for acidification)
1/4 teaspoon salt
1 tablespoon lemon juice or white vinegar (optional, for extra acidity)
Instructions:
Prepare the Milk and Cream Mixture: In a large saucepan, combine the whole milk and heavy cream. Stir well to mix.
Heat the Mixture: Place the saucepan over medium heat. Heat the milk and cream mixture gently until it reaches about 185°F (85°C). Stir occasionally to prevent the milk from scorching.
Add Acidification: Once the milk mixture reaches the desired temperature, add the plain yogurt or buttermilk. If you’re using lemon juice or vinegar, add it at this stage as well. Stir gently to combine.
Curdling: Allow the mixture to sit undisturbed for about 10-15 minutes. You should see the milk start to separate into curds (solid) and whey (liquid). If curds are not forming, you can add a bit more lemon juice or vinegar to encourage curdling.
Strain the Curds: Place a fine-mesh strainer or cheesecloth over a large bowl. Carefully pour the curdled mixture into the strainer to separate the curds from the whey. Let it drain for about 15-20 minutes. For a creamier texture, drain for a shorter time; for a firmer cream cheese, let it drain longer.
Blend the Cream Cheese: Transfer the drained curds into a food processor or blender. Add the salt and blend until smooth and creamy. If the mixture is too thick, you can add a little of the reserved whey to achieve your desired consistency.
Taste and Adjust: Taste the cream cheese and adjust the seasoning if needed. If you prefer a tangier flavor, you can add a bit more lemon juice or salt.
Chill and Store: Transfer the homemade cream cheese to an airtight container. Refrigerate for at least 2 hours to allow the flavors to meld and the cream cheese to firm up.
Use and Enjoy: Homemade cream cheese is perfect for spreads, baking, or as a base for various recipes. Use it in your favorite dishes or as a delightful addition to bagels, sandwiches, and more.
Storage: Store the cream cheese in the refrigerator for up to 1 week. For longer storage, you can freeze it in an airtight container for up to 3 months. Thaw in the refrigerator before using.
This recipe yields a delicious, creamy cream cheese that’s perfect for both sweet and savory dishes. Enjoy the fresh taste of homemade cream cheese in your cooking and baking!
Salad Dressings
Various homemade dressings like ranch or vinaigrette
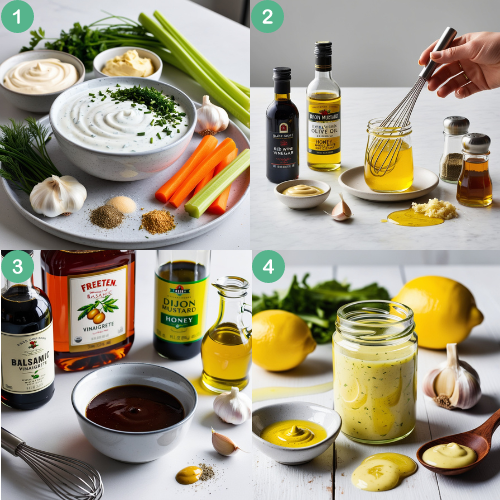
Ingredients:
1 cup mayonnaise
1/2 cup sour cream
1/2 cup buttermilk
1 tablespoon fresh chives, chopped
1 tablespoon fresh parsley, chopped
1 teaspoon fresh dill, chopped (or 1/2 teaspoon dried dill)
1 garlic clove, minced
1/2 teaspoon onion powder
1/2 teaspoon dried mustard
Salt and pepper to taste
Instructions:
Mix Base Ingredients: In a medium bowl, combine the mayonnaise, sour cream, and buttermilk. Stir until well blended.
Add Herbs and Spices: Add the fresh chives, parsley, dill, minced garlic, onion powder, and dried mustard to the mixture. Stir to incorporate all ingredients evenly.
Season: Season with salt and pepper to taste. Mix well.
Chill: Cover the bowl and refrigerate for at least 30 minutes before serving. This allows the flavors to meld.
Serve: Stir the dressing before serving. Use it as a dip or salad dressing.
2. Classic Vinaigrette
Ingredients:
1/4 cup red wine vinegar
1/2 cup extra-virgin olive oil
1 tablespoon Dijon mustard
1 teaspoon honey or maple syrup
1 garlic clove, minced
Salt and pepper to taste
Instructions:
Combine Ingredients: In a small bowl or jar, combine the red wine vinegar, Dijon mustard, honey, and minced garlic.
Add Oil: Slowly whisk in the olive oil until the dressing is emulsified. If using a jar, put the lid on and shake vigorously.
Season: Add salt and pepper to taste. Mix well.
Adjust Flavors: Taste the vinaigrette and adjust seasoning or sweetness as needed.
Serve: Use immediately or store in the refrigerator for up to a week. Shake or whisk before each use.
3. Balsamic Vinaigrette
Ingredients:
1/4 cup balsamic vinegar
1/2 cup extra-virgin olive oil
1 tablespoon Dijon mustard
1 tablespoon honey
1 garlic clove, minced
Salt and pepper to taste
Instructions:
Combine Ingredients: In a small bowl or jar, mix the balsamic vinegar, Dijon mustard, honey, and minced garlic.
Add Oil: Gradually whisk in the olive oil until the dressing is well combined. If using a jar, shake it well.
Season: Add salt and pepper to taste and mix thoroughly.
Adjust Flavors: Taste and adjust seasoning if necessary.
Serve: Serve immediately or refrigerate for up to a week. Shake or whisk before using.
4. Lemon Garlic Dressing
Ingredients:
1/4 cup lemon juice (about 1 lemon)
1/2 cup extra-virgin olive oil
1 garlic clove, minced
1 teaspoon Dijon mustard
1 teaspoon honey
Salt and pepper to taste
Instructions:
Mix Ingredients: In a small bowl or jar, combine the lemon juice, minced garlic, Dijon mustard, and honey.
Add Oil: Slowly whisk in the olive oil until the dressing is well combined.
Season: Add salt and pepper to taste and mix well.
Adjust Flavors: Taste and adjust the seasoning or sweetness if needed.
Serve: Use immediately or store in the refrigerator for up to a week. Shake or whisk before use.
These recipes offer a variety of flavors to complement your salads and dishes. Feel free to adjust the seasoning and ingredients to suit your taste preferences.
Raisins
Homemade, dried fruit that can be added to snacks or baked good

Fresh grapes (any variety, but red or black grapes are preferred)
Optional: A pinch of salt (for flavor enhancement)
Instructions:
Choose and Wash Grapes:
Select ripe, plump grapes. Look for ones that are firm and free from blemishes.
Rinse the grapes thoroughly under cool water to remove any dirt or pesticides. Pat them dry with a clean towel.
Prepare the Grapes:
Remove the grapes from the stems. Discard any damaged or spoiled grapes.
You can leave the grapes whole or cut them in half to speed up the drying process.
Drying Methods: You can use one of the following methods to dry your grapes:
a. Oven Drying:
Preheat your oven to its lowest setting (around 170°F or 75°C).
Line a baking sheet with parchment paper to prevent sticking.
Arrange the grapes (or halved grapes) in a single layer on the baking sheet, ensuring they don’t touch each other.
Place the baking sheet in the oven. Leave the oven door slightly ajar to allow moisture to escape.
Bake for 2 to 4 hours, checking periodically. The grapes should shrivel and feel chewy but not hard. The drying time will depend on the size of the grapes and the oven.
b. Food Dehydrator:
If you have a dehydrator, set it to 135°F (57°C).
Spread the grapes evenly on the dehydrator trays in a single layer.
Dehydrate for about 12 to 24 hours, checking periodically. The raisins should be fully dried, plump, and chewy.
c. Sun Drying:
On warm, dry days, you can sun-dry the grapes. Place them on a clean tray or mesh screen in direct sunlight.
Cover with a thin cheesecloth to protect against insects.
Sun-drying may take 2 to 4 days, depending on the weather conditions.
Cool and Store:
Once dried, let the raisins cool completely.
Transfer them to an airtight container. Store in a cool, dark place. Properly dried and stored raisins can last for several months.
Optional Flavoring:
For added flavor, you can sprinkle a pinch of salt on the grapes before drying. You can also experiment with spices like cinnamon or a drop of vanilla extract for extra taste.
Usage:
Use your homemade raisins in snacks, baked goods, or as a sweet addition to salads and cereals!
Tzatziki
Homemade tzatziki sauce for dipping or as a salad dressing
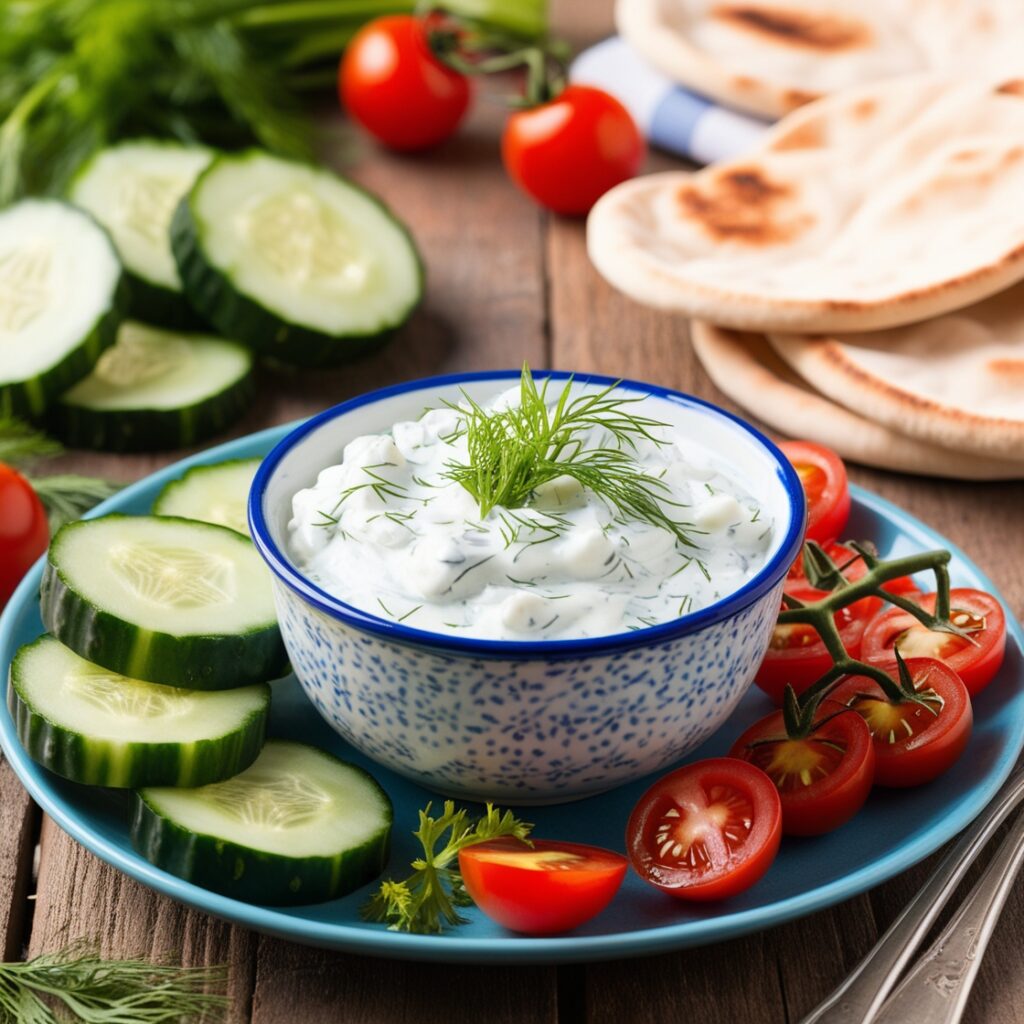
1 cup Greek yogurt (preferably full-fat for creaminess)
1 medium cucumber
2 cloves garlic (minced)
1 tablespoon olive oil
1 tablespoon white vinegar (or lemon juice)
1 teaspoon dried dill (or 1 tablespoon fresh dill, chopped)
Salt and pepper (to taste)
Instructions:
Prepare the Cucumber:
Wash the cucumber thoroughly under cool water.
Grate the cucumber using a box grater or food processor.
Place the grated cucumber in a clean kitchen towel or cheesecloth and squeeze out excess moisture. This step is crucial to prevent the tzatziki from becoming watery.
Combine Ingredients:
In a mixing bowl, add the Greek yogurt.
Stir in the drained grated cucumber.
Add the minced garlic, olive oil, white vinegar (or lemon juice), and dried dill.
Mix Well:
Use a spatula or spoon to mix all the ingredients together until well combined. Ensure that the cucumber and garlic are evenly distributed throughout the yogurt.
Season:
Season the mixture with salt and pepper to taste. Start with a pinch of salt and a few cracks of pepper, then adjust as needed.
Chill:
For the best flavor, cover the bowl with plastic wrap or a lid and refrigerate the tzatziki for at least 30 minutes. This allows the flavors to meld together.
Serve:
After chilling, give the tzatziki a quick stir before serving. It can be served as a dip with pita bread, fresh vegetables, or as a dressing for salads and grilled meats.
Storage:
Store any leftovers in an airtight container in the refrigerator. Tzatziki can be kept for up to 3-4 days.
Tips:
Customization: Feel free to customize your tzatziki by adding herbs like mint or parsley for extra flavor.
Serving Suggestions: Tzatziki pairs well with Mediterranean dishes, grilled meats, or as a sauce for wraps and sandwiches.
Ground and dried garlic
versatile ingredient that adds a rich, savory flavor to a variety of dishes
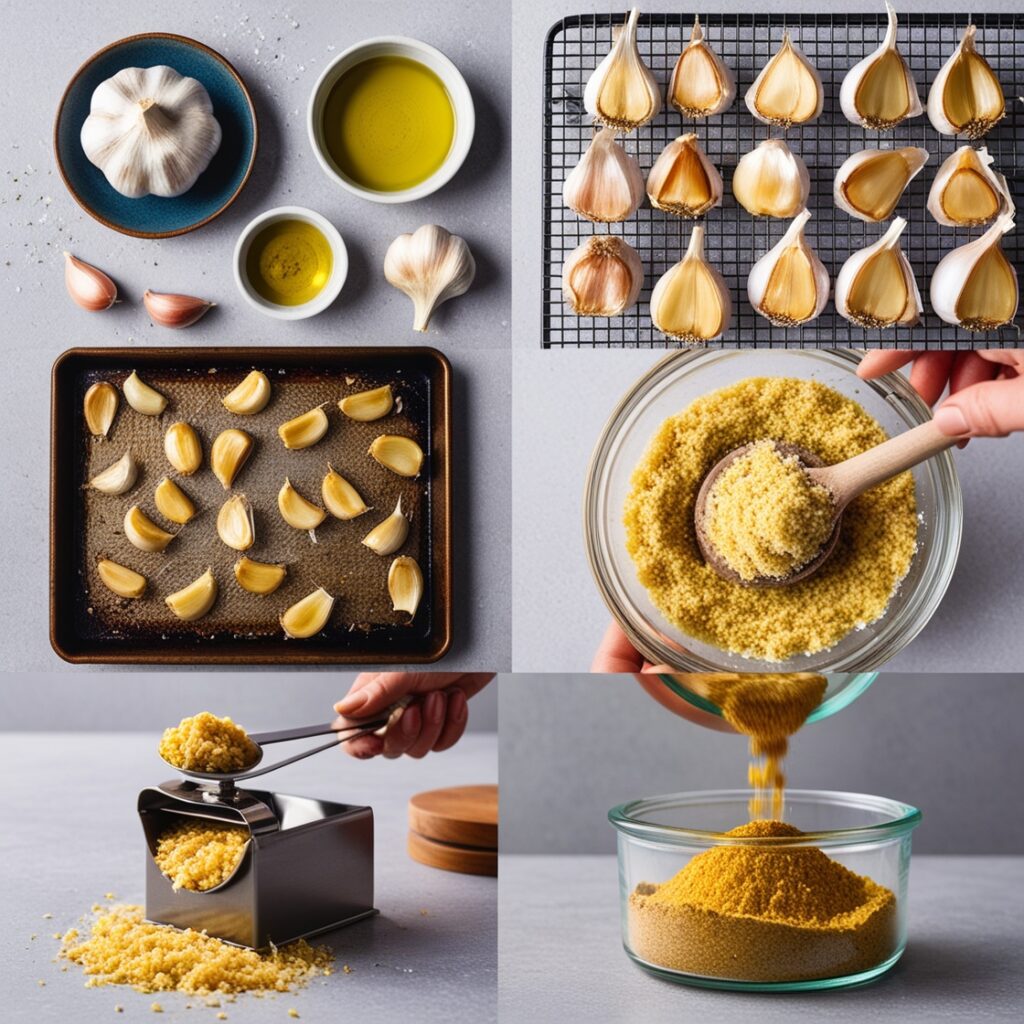
1 cup garlic cloves (fresh, peeled)
1 tablespoon olive oil (optional, for roasting)
Salt (to taste, optional)
Airtight container (for storage)
Instructions
Step 1: Prepare the Garlic
Peel the Garlic:
Take 1 cup of fresh garlic cloves and peel them. You can use a knife to slightly crush each clove to make peeling easier.
Step 2: Roast the Garlic (Optional)
Roasting for Flavor:
If you want a sweeter, milder flavor, preheat your oven to 400°F (200°C).
Toss the peeled garlic cloves with 1 tablespoon of olive oil (optional) and spread them on a baking sheet.
Roast for about 20-25 minutes, or until the cloves are soft and golden brown. Allow them to cool.
Step 3: Dry the Garlic
Air Drying:
For fresh, unroasted garlic, slice the peeled cloves thinly.
Place them on a drying rack or a baking sheet in a single layer.
Leave them to air dry in a cool, dry place for 4-10 days, until completely dry.
Oven Drying:
Preheat your oven to its lowest setting (around 150°F or 65°C).
Spread the sliced garlic on a baking sheet in a single layer.
Dry in the oven for about 2-3 hours, checking frequently to prevent burning.
Using a Dehydrator (Optional):
If you have a food dehydrator, slice the garlic and dry it according to the manufacturer’s instructions, usually around 135°F (57°C) for 6-10 hours.
Step 4: Grind the Garlic
Grinding:
Once the garlic is completely dry and cool, transfer it to a spice grinder, blender, or mortar and pestle.
Grind until you achieve a fine powder.
Sifting (Optional):
If desired, sift the ground garlic through a fine mesh strainer and re-grind any larger pieces for a finer consistency.
Step 5: Store the Ground Garlic
Storage:
Transfer the ground garlic to an airtight container.
Store it in a cool, dark place, like a pantry or cupboard.
Shelf Life:
When stored properly, ground dried garlic can last for up to 6 months.
Usage
Ground and dried garlic is a versatile ingredient. Use it to enhance the flavor of marinades, sauces, soups, roasted vegetables, and more. Start with a small amount, as its flavor is concentrated, and adjust according to taste.
You can find more Pantry Staples Homemade here:
– Kitchen Staples: Key Ingredients for Quick, Healthy, and Delicious Meals
Incorporating pantry staples into your cooking routine through DIY methods offers numerous benefits. From improving health to saving money, DIY homemade pantry staples can enhance your culinary experience. By experimenting with homemade pantry mixes and easy kitchen staples you can make yourself, you can create a pantry full of versatile, nutritious options. Consequently, embracing kitchen pantry staples you can make at home will make your cooking more enjoyable and efficient.